Thursday, November 29, 2012

AMS Adobe Media Server: Getting Great RTMFP Quality

Problem:
If you're new to working with Adobe Media Server (previously Flash Media Server) you may find that your video quality is not looking so great. But why?

Solution:
There are several key factors involved when trying to reach the maximum video stream quality between users. By analyzing how these are implemented in your system, you will be able to tweak settings until you reach the best stream quality possible.

1. RTMFP:
Before this protocol, Flash was only able to stream video using RTMP. This protocol is TCP based which means overhead for packet delivery. RTMFP uses UDP which allows for dropped packets without adverse effects. Another major improvement is that video streams are able to be streamed directly between users (P2P) and aren't relayed by the media server. This can reduce your hardware requirements possibly saving money while improving the user experience.

2. Bandwidth:
This is one of the fastest ways to kill your video quality and a factor you will have little to no control over. User's transferring video streams between each other using RTMFP bypass the server which means you only need the computing power to store their unique fingerprints and lightweight socket connections (a story for another time). This also means that the quality the user transmits is completely up to the bandwidth available to that user. If they have a shoddy internet connection or overloaded / slow internet equipment, this will quickly hamper the experience for the other user. Keep in mind that the user is uploading video data (which is typically much less available bandwidth for users than download speeds).

3. Camera Settings:
When setting up the Camera singleton to transmit data to the media server, you have a couple different options.

  • Camera Size: (Default: 160x120)
    • Try to match the same dimensions as the player showing the stream. Having this set low with a large playing area will cause gross pixelation. Likewise, having the player be smaller than the dimensions of the video feed will cause sharpness in the picture to occur. (Note: Some cameras will only output up to a certain size, after this point, Flash scales the feed causing pixelation.) Set this using setMode method.
  • Camera FPS: (Default: 15)
    • The FPS will of course determine the ideal rate as which frames in the stream are sent to the other user(s). This is only recommended as the recipients will determine if this rate is achievable with the given bandwidth and quality. Set this using setMode method.
  • Camera Quality: (Default: 50)
    • This will determine the compression applied to the frames transmitted to the other clients. Setting this to zero will prioritize bandwidth property below adjusting the quality as needed to maintain bandwidth settings. Set this using the setQuality method.
  • Camera Bandwidth: (Default: 16384)
    • The bandwidth property allows you to limit the usage of bandwidth while trying to maintain the FPS and quality settings you have determined or that exist by default. Setting this to 0 will prioritize the quality of the frames while reducing FPS to maintain constant streaming. Set this using the setQuality method.

By tweaking these settings and using your existing user analytics (and your preferences), you should be able to calculate the best values for each of these settings.

While there is no way to 100% ensure perfect picture and high quality streaming between users, tweaking the settings above will help you get the most out of it and give your users the best possible experience.


Saturday, November 24, 2012

Dynamic Application Instances - AMS Adobe Media Server / FMS Flash Media Server

Problem:
While playing around with Adobe Media Server and writing an application for it, I wanted to figure out how to add dynamic applications with custom instance names. I looked through the Administration API trying to figure out how to dynamically generate new application instances (which I refer to as rooms).

Solution:
The solution was right under my nose the whole time, turns out all you need to do is specify the context when connecting to the application on AMS (even without the application running) and it will create that application with the instance name you provide.

For example
This will connect the to application:
netconnectionvar.connect("rtmp://localhost/chat", params);

And this will create a new instance of the chat application:
netconnectionvar.connect("rtmp://localhost/chat/instancename", params);


Hopefully this will save you quite a bit of time.

Friday, November 16, 2012

AMS Adobe Media Server / FMS Flash Media Server - Reset Administrator Password

Problem:
Working with Adobe Media Server (used to be called Flash Media Server), I had a situation in which I couldn't seem to remember my admin password.

Solution:
This turned out to be a pretty simple fix. If you go to where your Adobe Media Server is installed you will find a program called AMSAdmin.exe (or fmsadmin.exe). By entering in this command, you will be able to type in your new password.

$ amsadmin -console -u username


Wednesday, November 7, 2012

AS3 TextConverter.importToFlow Explained

Problem:
Working on a WYSIWYG type editor for a project, I found myself needing to import and export raw TextLayoutFormat in string format (vs XML) for use in transport. When obtaining the string data and using it within an import, I found myself not quite sure how to use the returned TextFlow object.

Solution:
This is how I solved the problem. First I used the importToFlow passing along my string, and specifying that it was in the TEXT_LAYOUT_FORMAT, and the configuration file I wanted the TextFlow to have (since it is only read-only following object construction).

var flow:String = TextConverter.export(textFlow, TextConverter.TEXT_LAYOUT_FORMAT, ConversionType.STRING_TYPE) as String;
var _textFlow:TextFlow = TextConverter.importToFlow(flow, TextConverter.TEXT_LAYOUT_FORMAT, configuration);

Now I found myself with two TextFlow objects, one which was the original connected to several controllers, and implemented with many event listeners, and so on. I actually had two problems.

Problem 1: The data string which I assumed had textflow structure within it, was empty. An empty string will fire an error, so be sure the string data is properly formatted and not empty.

Problem 2: Simply replacing my orginal TextFlow object with my new one meant that all my existing attribute would be lost.

I ended up creating a method called setupTextFlow which would take a TextFlow instance and apply all the listeners I wanted, as well as would loop through a dictionary of existing containers and reconnect them, and then finally set it to update all controllers.

Side Note: I wish I could just set the TextFlow object to contain my new data, but I couldn't find any methods that would allow me to just replace contents. replaceChildren almost seems to work, but I couldn't find a way to access all the children elements of the TextFlow for replacement.

Saturday, November 3, 2012

FFserver / FFmpeg Error : This feed is already being received.

Problem:
It has been a while since I have done much with ffmpeg (and I've never worked with ffserver). So when streaming a resource over my network, I was trying to get the browser to play the video natively. When I went to the browser and typed in the URL: http://192.168.2.5:81/canon.ffm. I got the following error:

This feed is already being received.

Solution:
Looking back at the ffserver conf file, I noticed there was a feed and a stream. To get the data to stream properly, I needed to use the Stream address which was canon.mjpeg. Once I had modified this, I was able to begin streaming the video data.

Coming Soon:
I'm working on a device (using raspberry pi) that will stream live video feeds over the internet for under $100. Stay tuned to see that research posted.

Thursday, October 11, 2012

Adobe Air (AS3.0) Tutorial - Transferring Audio/Text Real-time Over UDP Socket

Preface

To learn more about how data transmits on a lower level via UDP, I set out to write a quick proof-of-concept where I could connect two clients together and allow real time voice communication.

Some Quick Notes About UDP and TCP

UDP and TCP are two protocols (based on IP) which are used to transfer data over a network (i.e. the internet). Web pages use TCP because it guarantees that data packets reach the end recipient (if the packet does not reach the recipient, it will be resent). In contrast, UDP doesn't care if the packets reach their end destination, lost packets on a network are never resent because they are irrelevant. This makes UDP the perfect choice for real-time (minus latency) data transfer. Because UDP doesn't require any handshake or confirmation regarding packets, it tends to be more equipt to handle real-time video/audio data or be implemented in real-time multi-player games.

Why Adobe AIR?

© 2012 Adobe Systems Incorporated

My quickest programming language is ActionScript 3.0. I also knew that lower level libraries had already been written to handle the complexities of network data transferring namely ServerSocket (TCP implementation) and DatagramSocket (UDP implementation). Since I wanted to be fairly agnostic to the lower level working of this protocol for the time being, I decided this would work well for me.

These two socket classes only exist in Adobe AIR and are not available for standard SWF files. This is a security measure Adobe has implemented. However, I believe you can still use the socket class to make connections with a socket server, only IP binding classes aren't accessible.

The source for this project is linked following this article.

Our Goal

We are going to create a client which allows us to bind to a network IP address, and broadcast UDP packets to another client listening for incoming transmissions. While sending data, we will want to know what kind of data is being sent (i.e. audio data, text data, etc.). We also want the audio to play in real-time minus network latency and computation.

Goal Review:
  1. Client binds to local IP/port
  2. Client sends/receives UDP data
  3. UDP data can consist of more than one type of data (voice, text, etc.)
  4. Allow microphone input to be sent via UDP to other client (and visa versa)
  5. Client plays incoming audio data as it is received

Let's Begin!

Step 1

First, we need to setup a quick GUI to allow us to control our client. This means telling our client what IP address and port to bind to. We will also want a way to initiate the binding procedure.  Because we want to send text and voice data, we will want some controls to handle allowing the user to type and send messages as well as a button to allow us to begin transmitting voice data. To make things simpler to debug, I included a log textarea to display helpful information.

You can organize your client any way you feel will make sense. I used Flash Builder for my project (although you could easily do this with Flash Professional or a Free IDE like FlashDevelop). Here is my end result:

The view used for sending text data.

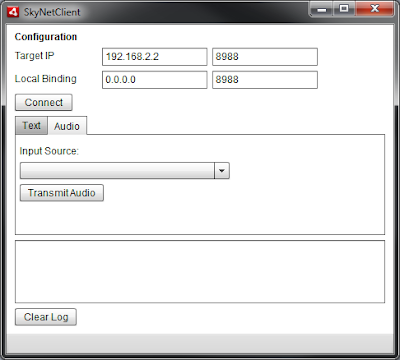
The view used for initializing voice data transfer.

Step 2

Now that we have a GUI, let's begin programming! Since we know that packets will be sent using UDP, we can determine that we will be using a DatagramSocket object. Let's add that to our instance scope now. 

private var updSocket:DatagramSocket = new DatagramSocket();

Next, let's add the socket binding process. Attach an onclick listener to your Connect button. Inside that method, we will do a couple things. First, we want to ensure that our socket is not already bound; second, we want to bind the socket to our input values. The local binding is what the socket will be listening to for incoming data, the target IP is where the UDP socket will send our data. My method is called bind and looks like this:

private function bind( event:Event ):void
{
    trace('binding');
    if( updSocket.bound ) 
    {
        updSocket.close();
        updSocket = new DatagramSocket();
    }
    updSocket.bind( parseInt( localPort.text ), localIP.text );
    updSocket.addEventListener( DatagramSocketDataEvent.DATA, dataReceived );
    updSocket.receive();
    log( "Bound to: " + updSocket.localAddress + ":" + updSocket.localPort );
}
You can see from my code that the local binding IP input has a name of localIp, and the port input has a name of localPort. The bind method belonging to the DatagramSocket class requires the first parameter to be an integer type which is why we call parseInt on the input text value. You can also notice that we attach a listener to the socket with a method called dataReceived which we want to handle incoming packet data. Lastly, we call the DatagramSocket's receive method to have it begin listening.

Note: The log method used above is not critical to the application, but if you are following along and wish to output information to a textarea component, you can use a log method like mine:

private function log( text:String ):void
{
    trace( text );
    logField.appendText( text + "\n" );
    logField.scrollToRange(int.MAX_VALUE);
}

The textarea created for log data has a name of logField. The scrollToRange method forces the lowest text in the textarea component to be consistently visible.

Question: Why does the localIp input value read: 0.0.0.0? This allows the socket to bind to the local IP addresses of the machine without you needing to know what the addresses are. For instance, you could use the local IP 127.0.0.1 in place of 0.0.0.0 and you probably wouldn't notice.

Question: Why port 8988? You could almost use any other available port on your machine if you want to. Sometimes, however, user's will have trouble binding to ports lower than 1024 on a Windows machine as those are reserved. 8988 seemed high enough to stay out of trouble, uncommon enough to not conflict with other applications, and easy to remember!

Note: In order for our client applications to communicate they must be transmitting data on the same port as they are listening on. If we listen on 8989 but another application is sending data to 8988, that data will be dropped and the clients will not be able to communicate.

Step 3

Congratulations! You have completed the first goal of this application! If you comment out your event listener in the bind method above, you can run your application and click the Connect button. Despite not seeing any visual changes, it should bind properly in the background. You will not really notice anything except for the log output if you have implemented that in your application.

Bytes: Data packets sent on a network (both UDP and TCP) are composed of bytes. These bytes are a breakdown of more complex data like strings or objects. These bytes are stored in a container called a ByteArray. A ByteArray allows you to perform calculations with byte data. Our datagram socket will be sending ByteArray objects between clients. In theory, you can send this data to other programming languages as long as the other language can interpret ActionScript byte code (object [de]composition) and the byte endians match.

Design Consideration: One of our goals above was to be able to send different types of data through our UDP socket to the target IP. In order to accomplish this, we will need a way to describe the data in the packet. There are various way to implement this, however, I chose to make the first byte of the packet an indication of what data follows it. For example, if the first byte is 0, that signifies to my application that the bytes behind it contain text data; likewise, if the first byte is 1, then the data after is be voice/audio data.

I call these flags and dictate this in the instance scope after the DatagramSocket object in my application.

private static const TEXT_FLAG:int  = 0;
private static const AUDIO_FLAG:int = 1;

Sending Data

Next we want to send text data over UDP. We are going to use the message textarea component and the Send button to handle this. Our goal here is to type a message in the textarea and click send which will place the text data into a UDP packet and send it to the target IP. Let's add a onclick listener to our Send button. In that method, (mine is called send) we will add the following code:

private function send( e:Event = null ):void
{
    //Create a message in a ByteArray
    var data:ByteArray = new ByteArray();
    data.writeUTFBytes( message.text );
    message.text = "";
    sendWrappedData(data, TEXT_FLAG);
}
This method creates byte data for our string by first creating a ByteArray container and then using the method writeUTFBytes (string) to have the string broken down into byte data. There are many helpful methods on the ByteArray class (I would suggest doing some exploring). You notice once we have used the text value in our message textarea, we clear our textarea. Last, we call a method (which you will see soon) passing two arguments. The first argument is the byte data for the string, and the second is the type flag which we want associated with this data.

The sendWrappedData method looks like this:


private function sendWrappedData(byte_data:ByteArray, wrapperFlag:int = 0):void{
    //Create a message in a ByteArray
    var data:ByteArray = new ByteArray();
    data.writeByte(wrapperFlag); // tell what kind of data this is
    data.writeBytes(byte_data); // add the data
    try
    {
        // send the data
        updSocket.send( data, 0, 0, targetIP.text, parseInt( targetPort.text )); 
        // log( "Sent message to " + targetIP.text + ":" + targetPort.text );
    }
    catch ( error:Error )
    {
        log( error.message );
    }
}
This method might look somewhat similar to the send method, but provides abstraction to allow us to pass anything into it which obeys our rules. This abstraction is important because it gives us a central location where the DatagramSocket is sending data out bound. This method also uses the targetIP input and targetPort input fields.

So we run the program and it still doesn't really appear to be doing much. Lucky for us, this is the fun part! We are going to implement the dataReceived method we commented out earlier for testing. This method will take the received packet, determine it's contents and handle the contents based on our first byte flag. The dataReceived method looks like this:


private function dataReceived( e:DatagramSocketDataEvent ):void
{
    // get packet descriptor
    var data_flag:int = e.data.readByte();
    // log('data flag: '+data_flag.toString(2));
    switch(data_flag){
        case TEXT_FLAG:
            var msg_txt:String = e.data.readUTFBytes( e.data.bytesAvailable );
            //Read the data from the datagram
            log("Them: "+msg_txt)      
            break;
        case AUDIO_FLAG:
            // trace('handle audio data');
            break;
    }
    log("Received from " + e.srcAddress + ":" + e.srcPort + "> " + e.data.readUTFBytes( e.data.bytesAvailable ) );
}

As you can see, this method first examines the first byte and uses a switch statement to determine what happens next.

Note: When you call a read* method from a byte array (which is what e.data is) it progresses a position pointer. This allow you to call read methods in sequence without worrying about managing a position pointer.

In the first case, we match the TEXT_FLAG byte which allows us to call readUTFBytes on the remaining bytes. This converts the byte data back into a string which we can then print to the log or output.

When we run the application now, we should be able to enter a message and send it to the recipient. If we use ourselves as the recipient by typing in 127.0.0.1 as the target, we will create a loop back which essentially sends the packets out to the network interface to be resolved which keeps it local to our machine.

Step 4

Wow! We now are sending text data across the network to another client! This accomplishes goal 2 and part of 3. If your still not convinced, export a build of your program and install it on another computer on your network, then use your network IP addresses to send data.

Now we want to get audio data moving over the network the same way that text is transferring. To do this, we need to first look at obtaining the incoming audio from our microphone. In the instance scope, let's add a variable that will point to an instance of the Microphone singleton.

private var mic:Microphone;

We will program out our Transmit Audio button by adding an onclick listener and inside the method called, we will add:

private function beingAudioTransfer():void{
    mic = Microphone.getMicrophone(); 
    mic.gain = 60; // dB boost 0-100
    mic.rate = 44; // kHz 5,8,11,22,44
    mic.setUseEchoSuppression(true); 
    // mic.setLoopBack(true); 
    mic.addEventListener(SampleDataEvent.SAMPLE_DATA, micSampleDataHandler);
}

The variable mic becomes a pointer to the Microphone object to which we set some various properties for. Gain (or volume), rate (in kHz), and echo suppression if desired. You can also enable the loopback method to ensure your audio is there, but this will become confusing if you use a UDP loop back to your own computer. The micSampleDataHandler method looks like this:

private function micSampleDataHandler(e:SampleDataEvent):void {
    sendWrappedData(e.data, AUDIO_FLAG); // pass audio bytes out via UDP socket
    System.gc();// garbage collection, we do this to help prevent memory overflow
}

This is simple enough, the data that we receive from the microphone instance is passed on to the UDP relay method to go out to our target IP. We won't do anything else with the audio locally, although we could play around with some byte compression to see if we can gain performance.

Step 5

See, you're already a pro at this! You just completed goal #4! Although we are not yet handling the audio data coming from the other client, this is the last step to our program. We are sending out UDP packets as data is captured from the microphone.

Now let's handle those packets at they come into the application. In order for AS3.0 to play the sound data, it must be 44 kHz. The Sound object can't handle any other types and since we are trying to play our sound data as it comes in, we probably want to make sure it's set to 44 kHz. Let's create a Sound object in the instance scope.

private var soundPlayback:Sound = new Sound();

This object can be told to play, and then when it fires a sample event, it can take data that will define tones that get played.

Before we implement the SampleDataEvent listener, however, we are going to build a sound buffer. This will allow us to push audio bytes into the buffer, and have the Sound object play them back as though it was one continuous file. Because our buffer will hold byte data, we are going to use the ByteArray container. Add a sound buffer to your instance scope:

private var soundBuffer:ByteArray = new ByteArray();

Now we need to load the buffer, so we are going to modify the dataReceived method for case 2. We need to implement a couple changes to allow our recieved audio data to be added to the sound buffer. Change the  dataReceived method to be like this:

private function dataReceived( e:DatagramSocketDataEvent ):void
{
    // get packet descriptor
    var data_flag:int = e.data.readByte();
    switch(data_flag){
        case TEXT_FLAG:
            var msg_txt:String = e.data.readUTFBytes( e.data.bytesAvailable );
            //Read the data from the datagram
            log("Them: "+msg_txt)      
            break;
        case AUDIO_FLAG:
            // trace('more audio data');
            // if we are out of available bytes to read, clear our buffer
            if (soundBuffer.bytesAvailable == 0){
                soundBuffer.clear();
            }
            // load the buffer with audio data
            e.data.readBytes(soundBuffer);
            soundPlayback.play();
            break;
    }
    // log("Received from " + e.srcAddress + ":" + e.srcPort + "> " + e.data.readUTFBytes( e.data.bytesAvailable ) );
}

As you can see, we added a simple check to see when we should clear the buffer by checking to see if it has all been read (or is bytesAvailable == 0). Below that you can see that we readBytes from the e.data ByteArray into the soundBuffer. The syntax here might be a little bit confusing so reading the documentation will be helpful. After loading the buffer, we want to make sure that the soundPlayback object is trying to read that data.

Now we will implement the want to make sure we catch Sound playing events as they fire, so add the soundPlayback object with an eventListener into your constructor or first-run init method.

private function init():void{
    soundPlayback.addEventListener(SampleDataEvent.SAMPLE_DATA, outputSoundData);
}

Now we need to implement the outputSoundData method.

private function outputSoundData(e:SampleDataEvent):void{
    if (soundBuffer.bytesAvailable > 0){
        // trace('sampling: ' + soundBuffer.bytesAvailable);
        while (soundBuffer.bytesAvailable){
            var sample:Number = soundBuffer.readFloat();
            e.data.writeFloat(sample);
            e.data.writeFloat(sample);
            System.gc();
        }
    }
}

This method first checks to see if there are bytes to read before anything else (this might be a bit redundant). If we have bytes to read, we will loop through them taking each float and writing it out to the sound output. You may notice two lines that appear exactly alike. This is not a mistake, floats in the byte array are stored in  mono but the sound output expects stereo sound. To make our mono stereo as expected, we write the same value twice (one for each channel). This while loop ends with a request for garbage collection.

Conclusion

Well? How do you feel? Did you get all that? There is a lot to take in if your fairly new to programming but do your homework and it will all make sense. Assuming I wrote all the code right and explained everything clearly and that you haven't made any syntactical errors on your end, we should now have a running UDP socket client that takes text and audio data and sends them over the network to a listening client.

If you not quite sure about something, or I made a mistake, please let me know.

Download the Flash Builder source file here

Sorry, I no longer host the project file.

Saturday, September 22, 2012

Windows Vista / 7 - Aero Disabled Due to Mirror Driver

Problem:
Recently I installed some screen sharing software on my computer. After the installation, Windows Aero (the system that handle window decoration, coloring, and transparency) stopped working. When investigating the reason, Windows said it was due to a mirror driver.

If your only interested in the solution, skip down to Solution.

[Geek Out] What is a Mirror Driver:
A Mirror Driver is an alternate driver for the graphics card for the computer. This allows software to capture data at a low level without taking complete screenshots of your desktop as well as other optimizations. Mirror drivers are not compatible with Windows Aero so Windows will disable Aero so your mirror driver will work. Because this is a driver and not running software (more or less), closing the screen sharing application may not restore Windows Aero.

Solution:
Simply disabling the driver fixed the problem. You shouldn't need to uninstall any software to get Aero back up and running. Keep in mind, however, that you will need to enable/disable the mirror driver and restart Windows to get Aero running or the mirror driver running. Since your screen sharing software is dependent on the mirror driver, you will need the driver enabled to use the software.

Solution Guide - Enable/Disable Mirror Driver:

1. First we will need to navigate to the Computer Management console. This can be found by right-clicking Computer from either the Start Menu or your desktop. Choose 'Manage' from the context menu.

2. You should see the Computer Management console. This generally shows by having 3 columns. The far left column will have different areas in which we can manage. Click 'Device Manager'

3. The middle column will load a tree menu of your computer and the various components that make up the system. These components can have drivers. Expand the node called 'Display Adapters'.


4. You will most likely have more than 1 item listed under Display Adapters.

5. Look for an adapter (or driver) that indicates it may be a mirror driver. For me this is 'LogMeIn Mirror Driver'.

6. Right-click this item and select 'Enable' if you wish to use your screen sharing program, or 'Disable' if you wish to restore Aero effects to your desktop.

7. You can now close the Computer Management console and save any existing programs before restarting your computer. You will need to restart in order for this driver to be used or ignored by Windows.

Friday, September 7, 2012

AS3.0 VerifyError: Error #1024: Stack underflow occurred.

Problem:
I recently was publishing an AS3.0 project which was working fine during development testing. Once I published it and loaded in in the browser, the SWF file failed to load properly.

Solution:
First I had to install the debug version of Flash Player so I would be able to see errors that occurred.
Once I had installed this, I was able to see the problem:

VerifyError: Error #1024: Stack underflow occurred.
This can happen for a number or reasons, but my problem happened to be caused by what I call an noncaptured boolean expression.  Basically, it happened because I had this in my code:
DEBUG && trace('[ MainControlMenu ] resolveActionSelection');
The DEBUG variable is a constant that I can set in either the class scope or the project scope and allow me to only trace out certain parts of the application that I was actually working on. This allowed my console to not get cluttered with things that were important just not at this moment in my development.

Ultimately commenting these out or removing them will solve the problem.

Saturday, September 1, 2012

ActionScript 3.0 Binding

Problem:
I wanted to implement the equivalent to:

<fx:Script><![CDATA[
    [Bindable]
    public var str:String = "Default literal";
]]></fx:Script>

<s:Label text="{str}" />

Solution:
Using a ChangeWatcher singleton, I could identify the property I wanted to bind to and the method to call once that value changes. In this example, I use an nameless function, but you could easily use a function name and handle the callback there. Also note that this is self-referential but could reference any object available in this context.

ChangeWatcher.watch(this, "property", function(e:Event):void{
    trace(e.target);
});

Tuesday, August 14, 2012

This application is not correctly embedded (wrong wmode value)

Problem: 
While doing some development in Flash Builder using Starling (for mobile), I got the error:
This application is not correctly embedded (wrong wmode value)

Solution (Flash Builder 4.5+):
Change the renderMode in the XML app config file to either 'direct' or 'gpu'.

Solution (Flash CS5.5):
Under publish settings, click the Wrench icon on the left of the Player drop down near the top. Here you can choose to set Render Mode to GPU. At this point, you can't set it to "direct".

Side Note: 
CS5.5 users may be able to set render mode to "direct" with this solution: http://blog.michaeljbowen.com/?p=127


Tuesday, August 7, 2012

Reject calls in Twilio OpenVBX (Code Modification)

Problem:
Every week I get an automated call from some number to my Twilio number. It is very annoying and I don't want to pay (even a penny) every time this caller tries to dial my number.

Solution (Kind of):
When talking to Twilio support and suggesting that they allow you the control to deny numbers from ever reaching your numbers (block list) and therefore reducing harassment and saving precious pennies, they said such a system is not in place. One support rep noticed I was using the OpenVBX and shot me some PHP to reject this number.

I think this will only prevent the number from getting routed through your system, but you will still have to pay for each time these people call. (I'm fairly certain here, but I will verify and correct myself if found otherwise).

In order to block a number in OpenVBX you would need to modify this OpenVBX source file:
plugins/standard/applets/start/twiml.php
// block calls
$caller = normalize_phone_to_E164(isset($_REQUEST['From'])? $ci->input->get_post('From') : '');

$response = new TwimlResponse;

// Update this list of numbers
$block_list = array('+16146526398');
if (in_array($caller, $block_list)){
        $response->reject(array('reason' => 'rejected'));
}else{
        $next = AppletInstance::getDropZoneUrl('next');
        if (!empty($next)) {
                $response->redirect($next);
        }
}

$response->respond();

Saturday, May 5, 2012

Amazon, Youtube, Online Video plays green flickering screen

Problem:
Every so often when I go to watch a video online, the video won't play or only plays part-way and then goes to a screen flickering screen which I can't recover from. These videos are all being played through Adobe Flash Player.


Solution:
The solution is to disable hardware acceleration. Users who have this problem generally have an issue with the graphics card being compatible with Flash Player causing video rendering hand-off to the graphics card to be mutilated when it gets returned. This hardware acceleration can come in really useful when Adobe Flash is trying to render complex data. In this case, the only solution to our green flickering screen problem is to disable hardware acceleration.

To Disable Hardware Acceleration:

1. Right-click the mouse over the video screen. The Flash Player menu will appear and at the bottom you should see three menu items (Settings, Global Settings, and About Adobe Flash Player).

2. Select Settings. This will popup a small window with icon tabs at the bottom and a close button on the right.

3. Click the first tab (a computer screen icon with a play symbol). You should now have a checkbox that says "Enable Hardware Acceleration" next to it.

4. Deselect the checkbox for hardware acceleration.

5. Refresh the browser window containing the Flash movie.

Tuesday, March 13, 2012

Running Starling on Android AIR for Mobile

Problem:
I was watching a video about Starling and decided it would be great to use it in a mobile game or at least begin testing to see if this idea was feasible. Let me tell you how I set it up.

Solution:
I began by working within Flash Professional CS5.5 and tinkering around to get an Android application with Flash Player 11 (new enough to support stage3D), I was able to get Starling to run via the player in HTML using this article, but was unable to get it to work on my Android phone. I ultimately switched to Flash Builder 2.6 to avoid the headache debugging problems between Flash Professional and the Flex SDK 4.6.

After the switch, Starling of course ran without any issues when testing on my computer in both AIR and Flash Player. I then created a mobile ActionScript project to work out any issues on my phone. When I went to run debug the program on my Android, I continued to get an issue from within the Starling library saying that index 0 was out of range.

RangeError: Error #1125: The index 0 is out of range 0.  
at starling.core::Starling()[C:\dev\libraries\starling\src\starling\core\Starling.as:165]
at Startup()[C:\Users\mikekim\Adobe Flash Builder 4.6\StarlingMobileTest\src\Startup.as:21]
at runtime::ContentPlayer/loadInitialContent()
at runtime::ContentPlayer/playRawContent()
at runtime::ContentPlayer/playContent()
at runtime::AppRunner/run()
at AppEntryCommon/run()
at global/runtime::AndroidMobileDeviceAppEntry()

With a quick Google search, I discovered that this was due to the fact that AIR for mobile does not support stage3D. More reading led me to when these features would become available. Adobe AIR 3.2 will have support for stage3D and will be available in the first half of 2012. Currently, a release candidate is available for those interested in working with AIR 3.2 now.

Install Adobe AIR 3.2 RC here

Once I had finished installing the AIR 3.2 RC, I was able to successfully run Starling (with the ParticleDesigner extension) on my Android phone.

Starling w/ ParticleDesigner Extension running  on my Android Galaxy Vibrant
Note: Do keep in mind that applications that rely on the AIR 3.2 upgrade wont work for users who have not installed/upgraded to AIR 3.2 on their mobile device, so please don't publish any applications to market with this dependency. If you do, almost all of your users will not be able to enjoy your hard work for what could be several more months.

UPDATE: AIR 3.2 should be available now for the general mobile public.

Monday, March 12, 2012

Best JavaScript OOP Tutorial I've Seen

Problem:
If your new to JavaScript but have programming experience with other object-orientated languages, you will probably find that JavaScript is a little bit different animal.

Solution:
Lee Brimelow does an incredible job at explaining JavaScript OOP design with a easy-to-follow and slow paced 20 minute video.

http://gotoandlearn.com/play.php?id=159


Thursday, March 8, 2012

JavaScript Throwing HTML Elements

Problem:

While working on a programming project that would show my wife how much I loved her on Valentine's Day (yes, I'm that nerdy, no traditional flowers from me), I wanted to build a slideshow with images that my wife could drag and throw photos around and so on. While I looked for something already written that would do the trick but I did a lot without canvas and couldn't change at this point. I never found anything that would allow for that 'throwing' action and ended up not having that functionality available in the program.

Solution:
For kicks, I wrote my own.

Example:
Solo Item
Multiple Items
Photo Items

While it is certainly not perfect and more of a proof of concept more than something used in a production platform, I am hoping it offers something to someone out there. The concept is simple enough.

If you use this code please credit me. Thank you.

Thursday, February 16, 2012

Adding Your Tab Application to Your Facebook Page

Problem:
I keep forgetting this simple instruction and have to go look for it.

Solution:
I post it here:


https://www.facebook.com/dialog/pagetab?app_id=YOUR_APP_ID&next=YOUR_URL


where YOUR_APP_ID and YOUR_URL can be found in your app settings.

Source: https://developers.facebook.com/docs/appsonfacebook/pagetabs/

Monday, February 13, 2012

Upgrading Flash Builder 4.5 to Flash Builder 4.6

Problem:
Interested in using many of the cool new features in Flash Builder 4.6 including native extensions, I was anxious to install 4.6 and get started. I purchased CS5.5 last year and Flash Builder 4.5 came as part of that suite. I completely uninstalled Flash Builder 4.5 from my system (see below) and went to install FB 4.6. When I entered in my CS5.5 serial number the program said it was invalid and wouldn't except it. With frustration, I contacted Adobe support to ensure that I was in fact supposed to be able to install this FREE update. Which they replied that is of course was.

Solution:
After searching online I found a thread in the Adobe support forums with all the answers I needed. In short, you install FB 4.6 and choose trial mode (for installs where FB was part of the suite only, see below for standalone updates) and after FB 4.6 would detect the licence and appear registered.

Note: FB 4.6 required a complete re-install of the application due to many changed included with this update. More information here.

Installation Instructions (for standalone and Creative Suite versions of Flash Builder)
Begin by uninstalling the version of Flash Builder on your computer.

On Windows, navigate to Control Panel and choose to Uninstall a program (Windows 7) or Add/Remove Programs (Windows Vista).

For Standalone installations
Find Flash Builder 4.5 in your program list and proceed to uninstall it. When given uninstall options, choose both Flash Builder 4.5 and AIR for Apple IOS Support.

For FB installed with Creative Suite
Select the Creative Suite and proceed to uninstall. The uninstallation program will now display a list of all the programs which have been installed with the Adobe suite. Select Flash Builder 4.5 and  AIR for Apple IOS Support  and uncheck all other programs. Continue to uninstall them from your computer.

Install Flash Builder 4.6
You may need to download the 4.6 program by going to https://www.adobe.com/cfusion/tdrc/index.cfm?product=flash_builder and choosing the appropriate version for your computer. Once you have downloaded the program continue to install it as normal. When prompted for a serial number, do the following:

Note: Some users have specified that they run into an error while installing FB 4.6 that stated:
A conflicting or prerelease version of Adobe Flash Builder exists on this computer. The conflicting version must be removed before installing from the current media.
If you get this error while installing FB 4.6, you will need to download the Adobe Cleaner which will remove additional files related to the issue. Be sure to only select the program Flash Builder before cleaning. It is also recommended by some users to completely reboot your computer after running the Adobe Cleaner and prior to installing Flash Builder 4.6

For Users who had previously installed Flash Builder 4.5 standalone
You will now need to enter the same serial number you used when you installed Flash Builder 4.5. If you have lost this or have trouble getting that serial number to work. Contact Adobe for technical support.

For Users who had previously installed Flash Builder 4.5 as part of a Creative Suite
You will now choose the trial mode and continue with the installation.

On start-up, Flash Builder 4.6 should start properly without any indication of being in trial mode as it should have now detected the previous licence used for Flash Builder 4.5.

If you continue to have issues, or the install does not work properly, contact Adobe Technical Support.


Wednesday, February 8, 2012

CodeIgniter 2.1.0 Facebook App: Wont Load in Facebook

Problem:
One of my clients currently has me working on a project involving the creation of a Facebook application. Since the project is small and needs to be completed ASAP, I chose a small light PHP framework for quick development which was CodeIngiter. Once I got my test application written I tested it on both the absolute URL and within Facebook. It worked fine by direct URL but when I attempted to load it on Facebook, it would give me the standard issue.

Solution:
When I set up my application, I went through and turned on all the usual configurations I thought might be helpful for this project without thinking much about it. Turned out one of these configurations prevented the application from loading inside Facebook, just like it should. If you haven't figured it out yet, it is the CSRF protection. When CSRF protection is turned on, a token is required when submitting POST data to a URL, this token is a randomly generated and provides security so another website can't submit data to your page in an attempt to exploit a user.

Once this was disabled, the application rendered as expected within Facebook.

Further More:
Because CSRF is important for web development to protect your users, would suggest implementing something similar to the method given on Facebook Authentication API page about half way down the page.

Friday, February 3, 2012

DreamHost: PHP generates XML without quotes and case insensative

Problem
Running a Twilio application on my personal server was working fine until I moved it to DreamHost. At that point my XML was corrupt and closer inspection showed that double-quotations we're missing and the XML tags case-sensitivity was not preserved. Initially I examined both setups knowing that it must have been a configuration issue. I verified that short_tags were turned off. But the problem continued.

Solution
When setting up this specific domain on DreamHost, I had checked to use page speed optimization (Beta). Knowing about Google's page speed efforts, I assumed measured had been taken and this had an issue with XML rendering the issues I mentioned above. I turned off page speed optimization on that domain through the DreamHost control panel and gave it about 10 minutes for everything to actually switch over. I tested the result again and found it to be exactly as expected.

Tuesday, January 17, 2012

Decompressing ZIP file error, 0x80004005 Unspecified error (Windows) OR File is broken (7zip)

Problem:
I torrented an operating system which contained a ZIP file of an ISO and some instructions, but when I went to decompress the ZIP file I was met by errors in Windows Explorer and 7-Zip.

Windows Explorer error:
An unexpected error is keeping you from copying the file. If you continue to receive this error, you can use the error code to search for help with this problem.

Error 0x80004005: Unexpected error

7-Zip error:
0 C:\Users\username\Downloads\Linux.zip
1 CRC failed in 'Linux'. File is broken.


Solution:
Remembering a compression suite from back in the day, I decided to try WinRAR and it worked. No errors were displayed and the operating system ISO had no issues when checked pre-install. I have no doubt that the ZIP file I had must have had an error, but only WinRAR was able to fix the problem.

Update: Apparently 7-Zip now can handle this issue. Thanks Terry!

Thursday, January 5, 2012

pdf2swf: cannot open shared object file. No such file or directory

Problem:
After compiling swftools on my linux box, I did some other tasks and then went to convert a pdf to swf file. When running the conversion, I was met with the following error:

/user/local/bin/pdf2swf: error while loading shared libraries: libjpeg.so.8: cannot open shared object file: No such file or directory

Solution:
This is due to where the libjpeg files are and where pdf2swf is looking for them. Looking at their documentation for installation, I found this:

Furthermore, a new installation of jpeglib (the following assumes it's in /usr/local/lib) often requires doing a:

 ranlib /usr/local/lib/libjpeg.a
 ldconfig /usr/local/lib

I executed these lines and everything went back to running smoothly. 

Tuesday, January 3, 2012

Fedora 15/16 Fails to Load GUI after Started SYSV on VM

Problem:
I'm running a Fedora distribution on VirtualBox on my PC and really like working with Fedora, however recently I found that Fedora would halt loading the GUI without errors and the last thing it said was Started SYSV.


Solution:
Remove NVidia Drivers and/or restore nouveau following the steps listed here. If you do not have nvidia drivers, you can delete the xorg.conf (or back it up) and continue to force dracut.

Steps:
I didn't have any idea why this happened initially, so here are the steps I took to figure it out. I could boot into recovery mode just fine, and I could switch to another text terminal (using CTRL + ALT + F2 or any F-key). I logged in with root and switched to run level 3 (/sbin/init 3). This worked fine, so I tried starting Xorg and it failed telling me an error with NVidia.

Following the steps in this blog solved my problem, hopefully it can solve yours too.

NOTE: In one of my tests, I was able to get a similar error but it was not NVidia related. I deleted my xorg.conf as is specified in the blog I link to and force dracut. When booting up, the system loaded the GUI and provided an error message forcing me to logout. Once I had done so, I was able to login and everything worked perfectly.